Miracast on Windows 10 – Do you want to display your PC screen wirelessly into a TV or projector? Yey, there is good news for you. Now we can easily doing this using Miracast on Windows 10 technology. Those days are gone when cables were the only way for transferring and transmitting media content from a PC or any other compatible device to a smart TV: Miracast is easy, fast and also secure. At this tutorial, we will tell you about what is Miracast and showing to you quickly setup and use Miracast on your Windows 10 PC.

What is Miracast ?
Miracast runs by the Wi-Fi Alliance, and it is a certification standard that let mirroring of content wirelessly from a compatible smartphone, PC, or the screen of a tablet to a monitor or television. It can also describe as “HDMI over Wi-Fi” since it enables content to be cast from one device’s display to another display without the use of any cables.
Wi-Fi streaming has achieved demand and popularity, and hence most streaming devices come with support for Miracast nowadays.
It first supported in Windows 8.1 and allowed sharing of 1080P HD videos and 5.1 surround sound, that combined give you a theater-like experience. Almost all modern computers supported with Windows 10 are Miracast enabled. At times, Miracast may not work, or your pc doesn’t support Miracast for two reasons: either it not supported on wireless display, or your PC has outdated drivers. To confirm whether Miracast supported on your pc or any other device, follow the procedure given below:
Download Miracast on Windows 10
A driver is a program that manages a distinct type of device that connected to your computer, or you can say it is the software that a connected device uses to work with your computer. If your PC mainly came with Windows 10 or Windows 8.1, then most probably it has Miracast support. Those who updated from Windows 7 to Windows 10 may not have this support. If your pc doesn’t make compatible with Miracast, there are few other options you can search.
For example, you can try to use Actiontec ScreenBeam USB Transmitter. It is a dongle, and similar to USB transmitters from other manufacturers that allow wireless display on Windows 8 and Windows 7 laptops even though they do not have support for Miracast.
If your pc supports Miracast, then also you will need to update Miracast drivers for it to work correctly. Wireless displays (Miracast) can only support by WDDM-Windows Display Driver Model 1.3 and up.
The simplest path to update your Intel wireless software and drivers is to download and install the Intel Driver Update Utility Tool. It automatically checks and updates your drivers to the latest version which is compatible with your operating system. If your Miracast drivers are not updated, then this tool will find them and give you the option to update them. To download this tool, follow the steps given below:
Step 1: First, download Intel Driver Update Utility Tool from the link given below:
https://www.intel.com/content/www/us/en/support/detect.html
Step 2: Find the download folder and search for a .exe file from it and click on it to run.
Step 3: Now, accept the terms and conditions of the license on the page that will open and next click on the ‘Install’ button.

Step 4: Now wait until the installation process completes.

Step 5: Once the installation completes, you have to click on the ‘Launch‘ tab.

Step 6: After launching the tool, click on the ‘Start Scan’ tab. The system will scan your overall system for drivers available. After scanning it will make a list of all the available drivers that need updating so you can update them.

Even, if the display you will try to project does not support Miracast, then you have to complete the connection by purchasing a Miracast adapter for TV. This Miracast adapter plugs into the HDMI ports of your Television and makes it possible for your PC to connect to the wireless display. If you want to buy then, Microsoft Wireless Display Adapter is best because it comes from Microsoft, but any other adapter (Miracast) would be fine.
When everything settles and connect, follow the steps below to mirror your Miracast windows 10 download display to your HDTV wirelessly.

How To Project Your Windows 10 PC Wirelessly To an HDTV
Step 1: First, Plug the adapter of Miracast into one of the HDMI port of your TV and select the HDMI channel for that port.
Step 2: Next, open the Windows 10 Start Menu on your pc or laptop whichever you want to project.
Step 3: Go and click on settings. Settings discovered in the bottom left corner of your screen.

Step 4: Select devices on the page that will open.

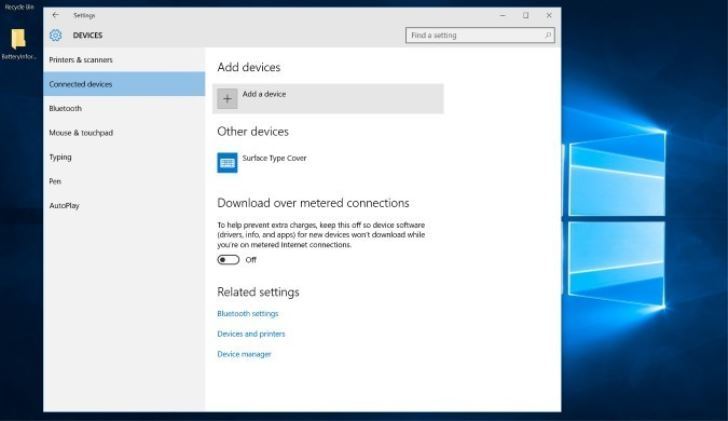
Step 5: Select connected devices and click on ‘Add a device.’ It will enable searching for new displays within the available range.

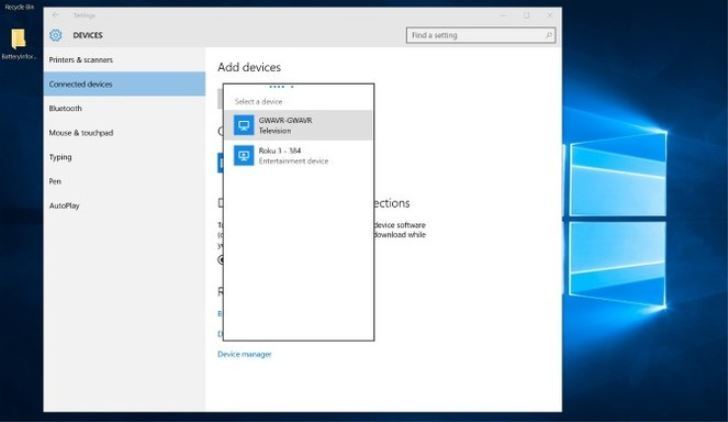
Step 6: On your screen, a list of connected devices will appear, and your TV will also be fall in one of them. If you are using an adapter, click on the name of it and your computer display will be projected to your HDTV or smart TV.

Check If Your Windows PC Supports Miracast:
Here are the steps to check whether your Windows computer has support for Miracast.
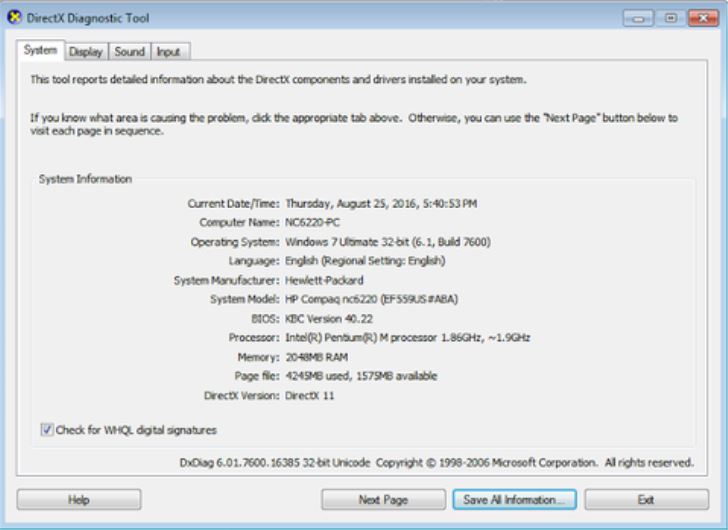
Step 1: Press Windows and R keys together on your keyboard to open the Run command box. Once it open type ‘dxdiag’ in a search box and press enter.

Step 2: On pressing enter a new window of DirectX Diagnostic Tool will open. After the tool completes collecting all the information about your PC, click on ‘Save All Information’ tab.

Step 3: Next, select the location where you want to save the DxDiag.txt file on your pc. You can save it anywhere on your computer, but for ease, it is recommended to save it to quick access location such as on the desktop.

Step 4: Open the file of DxDiag.txt. It is usually in notepad format. Scroll down until you reach to the bottom of the report where you will find the status of the Miracast on your PC. It will either read ‘Miracast is available,’ or ‘Miracast not supported.’ In the first case, your TV will be ready to cast its display to a compatible device, and in the second case, you might want to explore other options. So the other options are described below. If I talk about my computer system, then my PC has Windows 7, and hence it has no support for Miracast.

Miracast nowadays very popular path of projecting content from PC screen to HDTVs and any other large displays. Many manufacturers have welcomed the new display standard, and the market had seen plenty of Miracast approved devices since 2013 when the Wi-Fi Alliance first declared it at CES.
Users can now endlessly mirror the displays of their Miracast supportable phone, tablet, or laptop to any receiver which support Miracast such as a monitor, HDTV, or projector. With the mirroring content to the large screen, Miracast guards your connection with WPA2 encryption so protected content can freely flow through it.
It is all about Miracast windows 10. Hopefully, you can follow this simple step by step. Please share this tutorial if you care with another windows 10 user that need to project wirelessly. Thank’s for reading!